/
Sales Invoices
Sales Invoices
- Mark Jason Brumpton
Owned by Mark Jason Brumpton
|
Overview | |
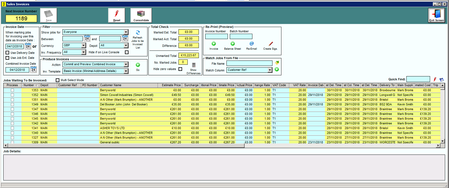
| Next Invoice Number | This shows the next available Invoice Number - this number will be assigned to the next Invoice Run |
| Reset | This button will untick any selected invoices even if they are not showing on the current filtered screen - we recommend pressing this before starting an invoice run to ensure that no previously selected Jobs will be accidentally invoiced |
| Invoice Date | In this section you can set the date that this Invoice will show, for single Job invoicing you can set the date to the Delivery date of the Job, however this will not work for combined invoices as the Delivery dates may be different |
Filter | Similar to the Browser you can use this to define a search for specific Jobs in the Jobs Waiting To Be Invoiced window |
| Produce Invoices | Use the upper drop-down box to determine the type of invoice you wish to run, the lower drop-down box is used to select the template to use for printing. |
| Total Check | Use this information to quickly see if there are any discrepancies between estimated total and actual total for the selected Jobs, Unmarked Total will show the total estimated price for all unchecked Jobs, No Marked Jobs will show how many Jobs have been selected in the Jobs Waiting To Be Invoiced window. If there are any differences between Actual Total and Estimated Total, these can be highlighted in the windows by clicking on the Show Differences button and will appear in the list highlighted with a red background. |
| Re-Print (Preview) | This allows you to view and re-print past Invoices and invoice batches, you can also use this to re-send previously sent invoice emails. |
| Match Jobs From File | If you have a file containing a list of Jobs that have been paid by a customer before you have invoiced them, you can use this to match the job numbers with the outstanding invoices. |
| Jobs Waiting to be Invoiced | This is a list of Jobs that have been completed but not yet invoiced, this is your pool that you select from to run invoices |
| Job Details | When you select a row from the Jobs Waiting To Be Invoiced (as in click the mouse on the row NOT tick the tickbox ), the details of that Job will be displayed here |
How to produce an Invoice
|
Related content
Create Invoices
Create Invoices
More like this
Record Invoice Payments
Record Invoice Payments
More like this
Record Invoice Payments
Record Invoice Payments
More like this
Correcting Invoices that have been processed
Correcting Invoices that have been processed
More like this
Supplier - Self Billing
Supplier - Self Billing
More like this
Exporting Invoices
Exporting Invoices
More like this