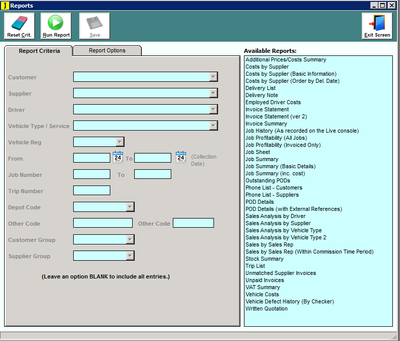
| Fig 1 | This is the main reports page from which we can print reports. On the right hand side is a list of all the reports that we can run, Each report will allow you to search for certain criteria using the textboxes in the Report Criteria section on the left. When you select the type of report that you wish to run, only the textboxes that apply to that report are active (N.B. leaving a textbox blank will include ALL entries for that textbox) Once you have selected the report that you wish to run and entered the relevant details in the Report Criteria, click on the Run Report button in the ribbon, this will open the report for viewing in another window. |
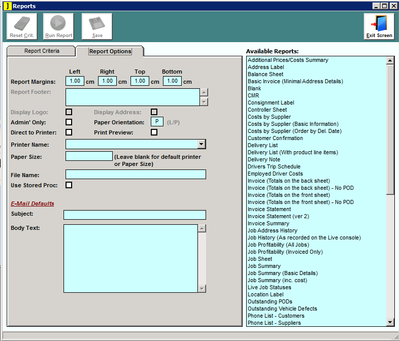
| Fig 2 | The Report Options Tab allows you to alter the default settings for the reports, each report can have its own settings - Report Margins = The area around the report that cannot be printed in
- Report Footer = The words that you wish to be placed at the bottom of all reports e.g. company Phone and Fax Number
- Display Logo/Address = Display the company logo and address on the reports (the logo is taken from the image stored in Lookup/Image Manager )
- Admin Only = This is set if the user needs to be an administrator to run this report
- Paper Orientation = Select P for portrait or L for landscape
- Direct to Printer = Tick this if you wish the reports to be sent directly to the printer without previewing, this is useful if your account is used in a warehouse where you are using the reports page to print labels, you wont need to preview every label that is printed, you just want to print them.
- Print Preview = Similar to the above setting however this one will not print until you tell it to
- Printer Name = Set the default printer that this report will use ( if left blank this will use your PCs default printer )
- Paper Size = What size paper does the set printer use
- File Name = The filename of the report that you are changing (this will automatically be entered when you select a report from the right hand side)
- Use Stored Proc: = This is ticked if the report requires a stored procedure to be run in order to form the report (this is only set by journease staff)
- Email Defaults - Subject = The subject header that will be added when this report is Emailed
- Email Defaults - Body Text = The text that will be sent as an Email (N.B. the report itself will be an attachment to the Email)
|
| Fig 3 | This section will appear at the top of report previews and allows you to navigate through the reports, print and email. Icons going from left to right - Export = export the report as a Crystal Reports File (.rpt)
- Print = Print the report to the selected printer
- First page = go to the first report page
- Previous = go to the previous report page
- Next = go to next report page
- Last = go to last report page
- Go to Page = go to a specific report page
- Close Current View = Close the current view
- Binoculars = Search for specific text within the report
- Binoculars + = set zoom ratio on current report view
- Show Email = Preview, alter and send the email to which this report will be attached
|
| Common faults when viewing / Printing reports:- - Please Note: The first time you export a report as a file you will need to browse to the drive / folder location you wish to save your *.rpt files to, for example c:\JourneaseFiles
2. The report looks "squished" or "elongated" = Check that the correct printer is being used, if you have no printer selected then Journease will use your PCs default printer, If this is a Label Printer then the report will be viewed as if it is going to be printed on a lablel |