Record Drivers Hours
- Mark Jason Brumpton
fig 1 |
fig 2 |
fig 3 | |
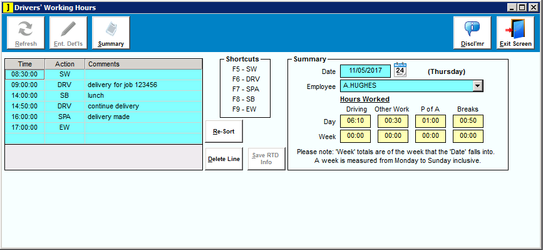
| KEY:- SW = Start Work, DRV = Start Driving, SPA = Start Period of Availability, SB = Start Break, EW = End Work |
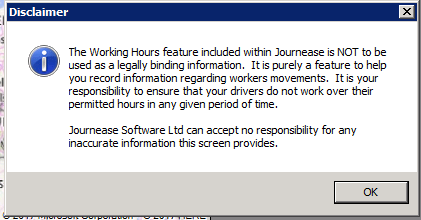
| The Working Hours feature included within Journease is NOT to be used as legally binding information. It is purely a feature to help you record information regarding workers movements. It is your responsibility to ensure that your drivers do not work over their permitted hours in any given period of time. Journease Software Ltd can accept no responsibility for any inaccurate information this screen provides. |
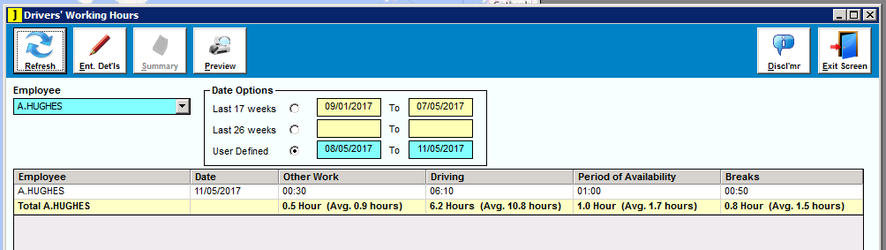
When you first open this window you will be presented with the disclaimer warning shown in fig 1 (this is also stated above as it is important information to read), this will also be displayed if you click on the Discl'mr button on the main window. Clicking ok will then take you to the main window (fig 3) however this will be empty to start with. To add a drivers hours we click on Ent. Det'ls button which will bring up the data entry window (fig 2). Here we select a date for the entry and choose an employee from the drop -down box on the right hand side. In the box on the left you will already have SW and EW which is Start Working Day and End Working Day respectively. These are determined by your work day settings in the profile tab of the Default Settings window but can be changed by double clicking in the relevant text box. In the next empty line down add a new time, Action and comment (in fig 2 above i put 09:00 DRV Delivery for job 123456 where DRV means Started Driving), dont worry about putting it in the correct place in the list as we can click the Re-sort button which will put them in Time Ascending order. Once you have filled out your working day Click the Save RTD Info button to save the details, if you make a mistake you can select the line and click Delete Line to remove it. Once saved we click on the Summary button to return to the main window. We can now select the employee in the drop-down box on the left and search by the criteria in the Date Options box (Select User Defined to add your own required dates) then click on Refresh. This will then show a summery of all the recorded times between the set dates for the set employee. Clicking on Preview will transfer this information into a report which you can then print out |